Posted on Leave a comment

Afternoon of workshops

I had a very inspiring afternoon at a fundraiser event for the Manitoba Crafts Museum. There were many different demonstrations and I had the opportunity to participate in three workshops.

I attended the “Leather Work” workshop by Jan Castillo, where we learned the basics of leather working by making a small coin purse. Loved it and will definitely do this again.

Leather purse.jpg

The second workshop I took was “Metis Beadwork” by Jennine Krauchi. Her work is just stunning. We learned floral beadwork using a two-needle technique. After spending a hour at the workshop I spent a couple more hours tonight finished up my little flower. A very humbling experience.

Beadwork.jpgBeadwork2.jpg

I ended the afternoon by learning a Japanese braiding technique called Kumihimo taught by Susan Styrchak. Hoping to transfer the simple string into a bracelet.

braiding.jpg

I really enjoyed learning some new techniques today and I will for sure participate in this event again next year.

Ciao

Anja


Posted on Leave a comment

Art exhibition – working around the clock

In case you are wondering what I have been up to over the past 2 years… well where to start. I have had very little time for my art due to my new job as the Senior Project Manager, New Media at the Canadian Museum for Human Rights. It’s been inspiring, crazy, tiring and rejuvenating all at the same time. The museum fully opened on November 11 and I switched my attention from opening a museum to getting ready for my exhibition. It’s been a lot of long hours but hey I was already used to that after working at the museum. I have loved being able to get lost in my art again and being able to spend 8 hours at a time in my studio creating and playing.

This new series being exhibited consists of illustrations, screen prints, encaustic paintings and a large format installation. Here is a sneak peek of what I have been working on… More details on the opening night to come in the next few days but please mark your calendars – the opening night is taking place on March 12, 7-11pm at cre8ery gallery in the Exchange.

Ciao!

Anja

Screen printing at Martha Street Studio
IMG_3905
Rabbits behind bars
IMG_3413
Owl illustration
Fox
Fox
Anja Studer Encaustic2
Encaustic landscapes
encaustic sky
Encaustic sky
Posted on 1 Comment

Playing with encaustics

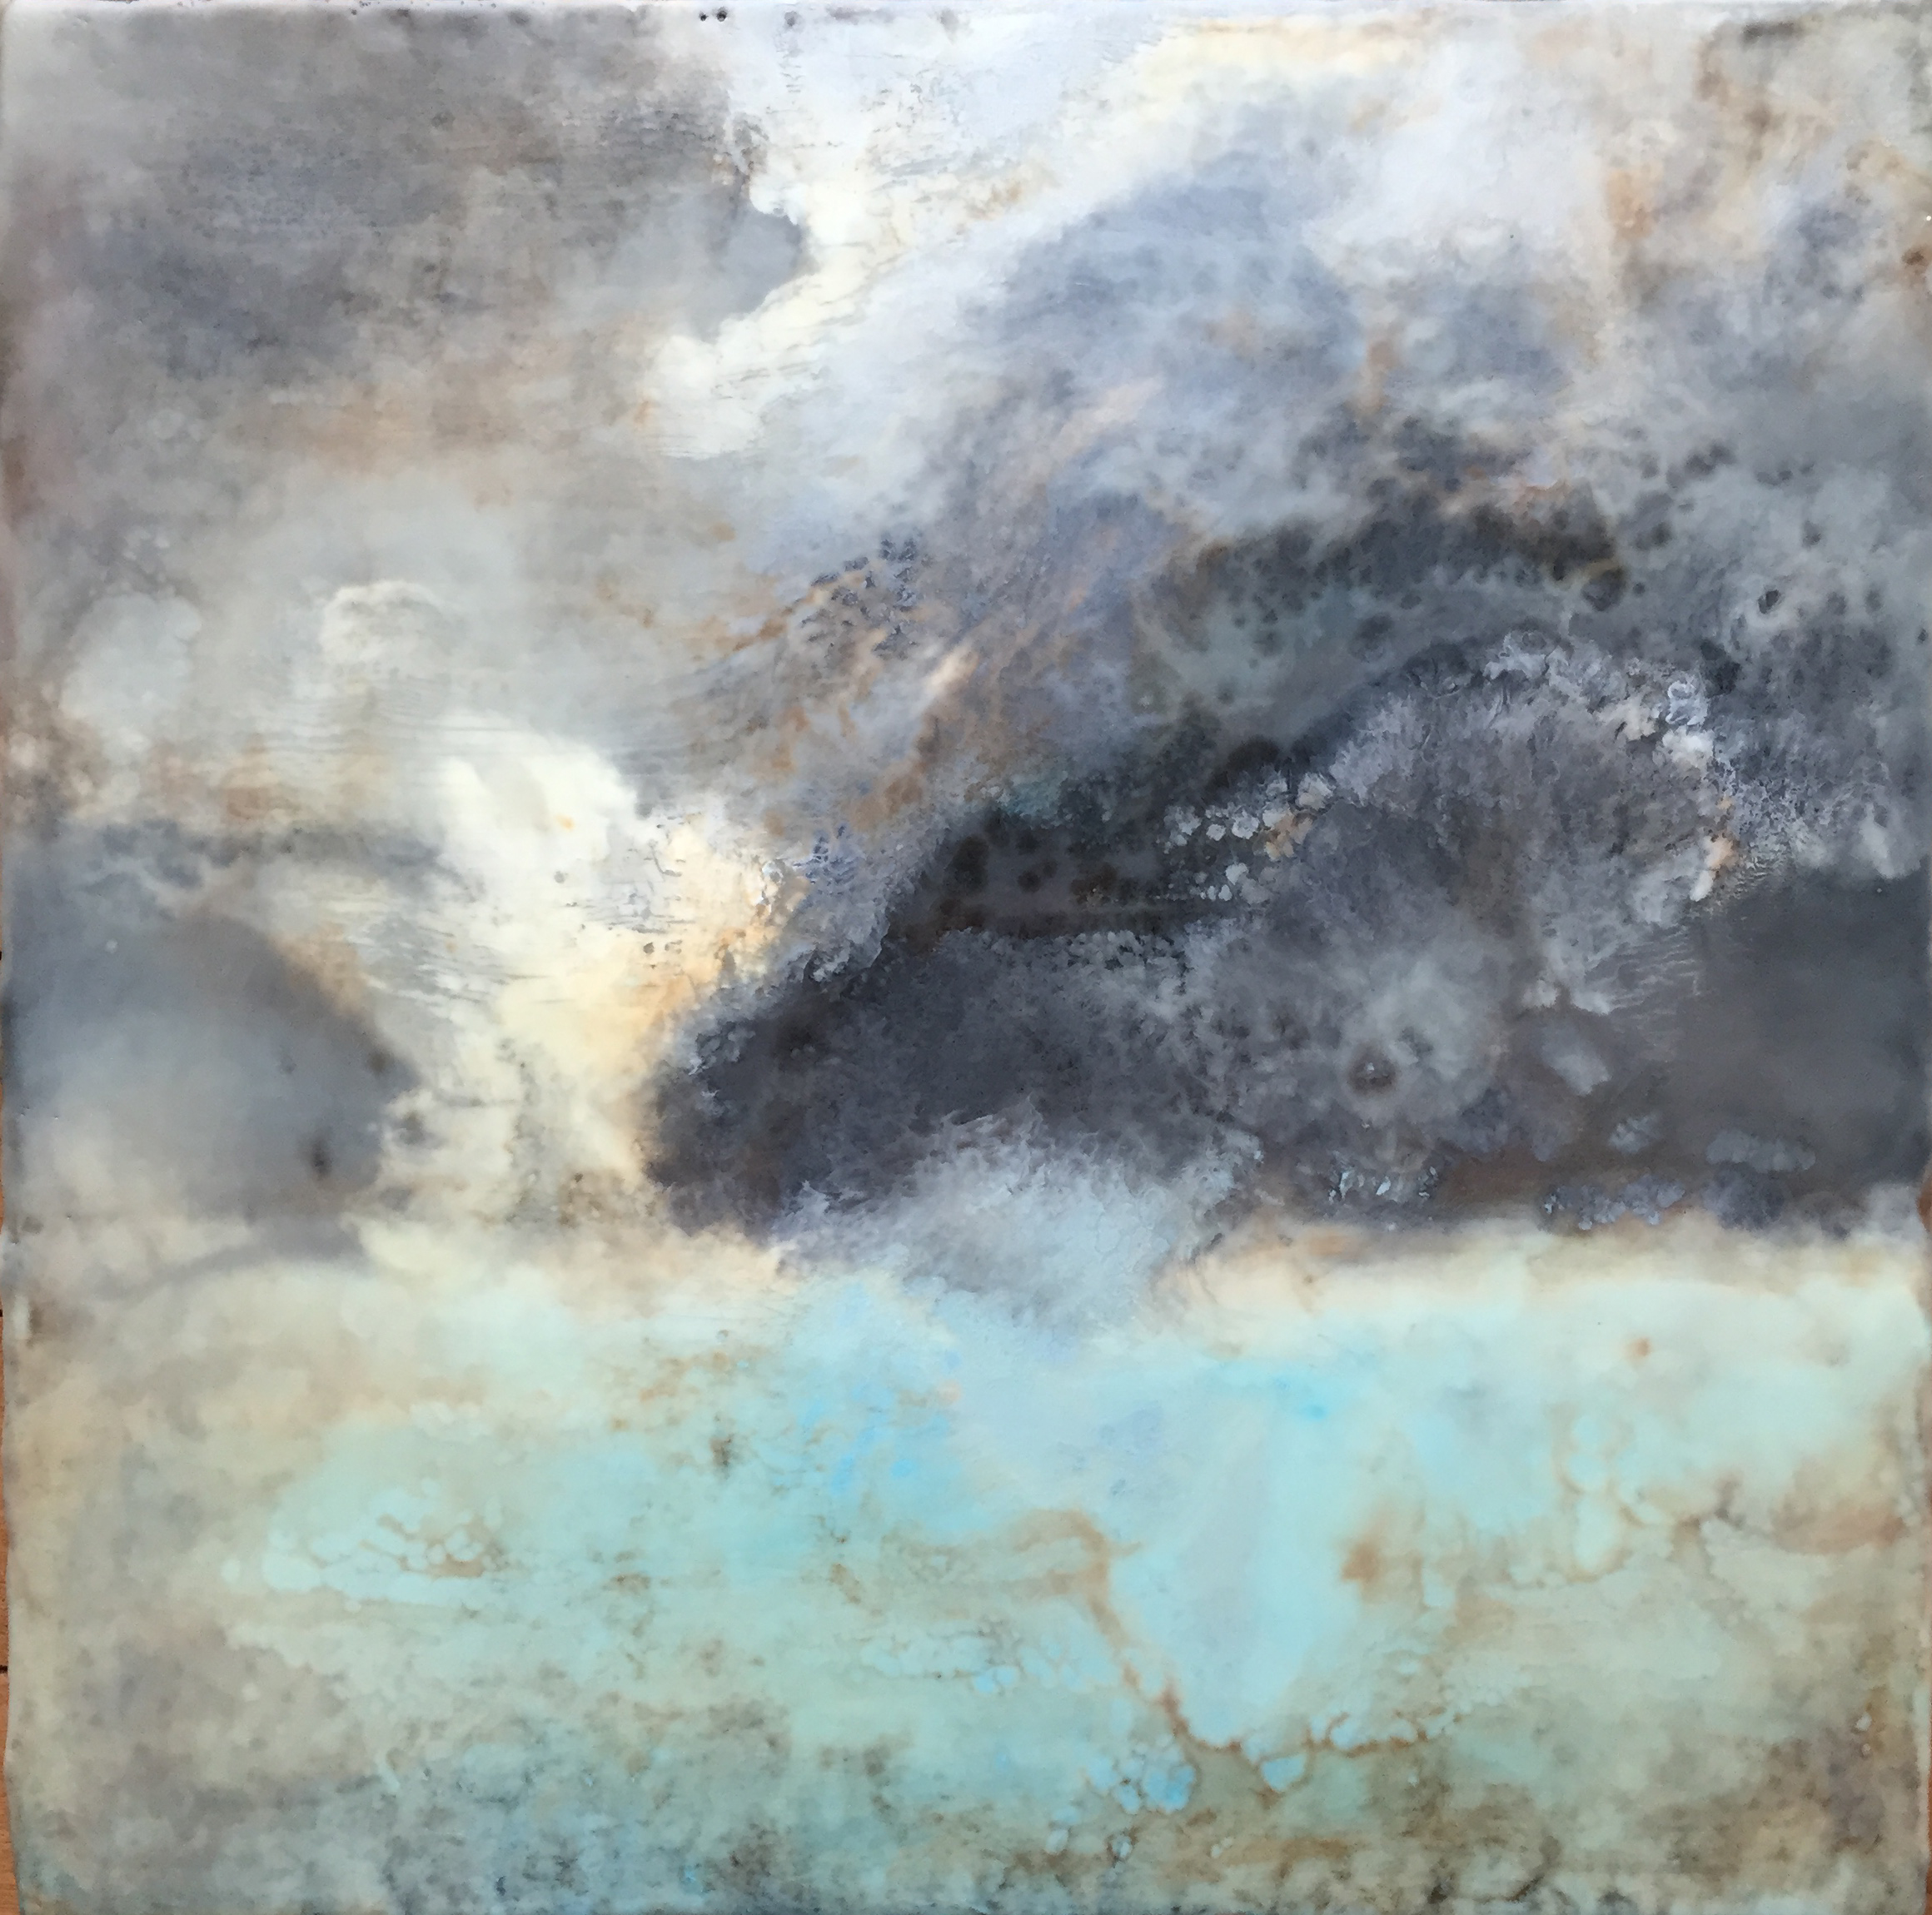
A few years back I went to see a talk + demo by the local artist Tim Schouten at the WAG (Winnipeg Art Gallery) with my friend and fellow artist Charlene Brown. We had both seen Tim’s encaustic paintings and were interested in learning more about his work and about encaustic in general. Seeing him work was fascinating and the following summer I made sure to visit his studio (http://www.watchthewave.ca/). I was intrigued and scared by this ancient medium and wanted to try it out so badly. I ordered some pre-made encaustic paints and started exploring. It was a lot of trial and error and a lot of playing with different tools – and playing is the key word here, as it truly feels like playing. I instantly fell in love with this medium. I have taken a workshop and have learned how to make my own encaustic paints from bees wax and damar resin. I don’t have proper ventilation in my studio so I decided to set up my encaustic studio on our deck. Painting outside solved the ventilation issue and I have to say it intensified the sense of playing as it reminded me even more of being a kid playing outside. I started working on my next solo show (March 2015 at cre8ery gallery) exploring the theme of dreams and illusions. 6 of my encaustic pieces will be exhibited at cre8ery gallery Nov. 5 to Dec. 10, 2013. Gallery hours are Tuesday & Thursday 12-8pm, Wednesday & Friday, 12-5pm and Saturday 12-4pm.

encaustic set up anja studer encaustic

Here is a bit more information about encaustic:

The word encaustic comes from Greek and means to “burn in”, which refers to the process of fusing the paint. Encaustic is a paint composed of beeswax, damar resin and pigments. The term “encaustic” is often used to describe both the paint itself, and the method for using it. Encaustic paint is applied molten to an absorbent surface, and then fused, (or re-melted), to create a variety of effects. Unlike other paints, encaustic is never wet or dry – it goes from a liquid to solid state and back again in seconds, which means additional layers can be added immediately, without disrupting your composition. Once the surface has cooled, the paint has reached a permanent finish, but the painting can be revised and reworked with heat at any time – minutes or years later.

Encaustic paint was first used over 5,000 years ago in Greece when it was used wax to seal their ships. Eventually they added pigment to decorate the boats.

The oldest surviving encaustic works are 2000 years old. These are the beautiful and realistic Fayum funeral portraits from Egypt. These were painted in colored waxes on wood and w.ere attached to mummy cases to commemorate the deceased and transport them to the afterlife. The wax has preserved them in near perfect condition.

Encaustic eventually fell out of favor because it was so cumbersome to use. Imagine melting wax paint over a wood fire by candlelight! The medium was replaced by tempera painting, fresco, and eventually oil painting. Still, it was kept alive over the centuries by small groups of dedicated artists. Many Impressionists and Symbolist artists experimented with wax. Some of the artists known to use wax in their paintings include Paul Gauguin and George Seurat.

My motto for this week: Try something new that scares you!

Ciao

Anja

Posted on 3 Comments

DIY Christmas gifts – T-Shirt quilt

My favorite time of the year (except summer) is the time leading up to Christmas. I love how friendly people are, the beautiful Christmas decoration, Christmas music and I love giving gifts. The process of looking for the perfect gift or even better making the perfect gift for somebody you love. The anticipation of them opening the gift and the happiness and surprise on their face. I often make many of my Christmas gifts for my family and friends and this year was no different. I made Christmas ornaments for my friends (watch for DIY part 2 for instructions), I framed one of my screen prints for K. and the pièce de résistance this year is the quilt I made for him. He is a huge Star Wars fan and has been holding on to his old Star Wars T-Shirts. They have been sitting in a bag in our basement for years and he has refused to get rid of them. Years ago I had seen a quilt made from old T-Shirts and I thought that it would be a perfect way to recycle his shirts into something he can continue to use. He absolutely loved it and we have been enjoying naps on our sofa over the holidays covered with our warm and eco-friendly Star Wars quilt.

It was easy to make, so if you have a collection of band T-Shirts or souvenir shirts from your travels, this is a great way to make something that you can continue to cherish for many years to come. Here are step by step instructions with some pictures.

T-Shirt quilt
T-Shirt quilt
  1. Wash all your T-Shirts.
  2. Layout your shirts on the floor and decide on the size for each square (I made them all the same size but you could have different sizes. I decided on the size based on the shirt with the largest graphic).
  3. Create a template from a piece of cardboard.
  4. Place the template on each shirt and outline using a fabric marker or you can also use a Sharpie and then cut them out using scissors.
  5. Once you have all shirts cut place them on the floor and decide on the layout (I didn’t have enough shirts so I used the back of some of the shirts to add blank squares).

    Decide on the layout
    Decide on the layout
  6. Start sewing each horizontal row by placing the first squares together (with image area facing each other) and sew using a straight stitch. Then add the next square etc. until you have each horizontal line sewn together.
  7. Before you sew all the individual rows together, press the seams apart on the back and pin in place.
  8. Place the first two of the horizontal rows together (image area facing each other), make sure to line up the seams and pin in place.
  9. Sew using straight stitch and repeat with all rows.

    All squares sewn together
    All squares sewn together
  10. Decide on the size of your quilt (the size of your sewn together T-Shirts or do you want to have a border around).
  11. Choose a fabric for the back (I decided to use a nice warm fleece), and buy quilt batting (make sure to get some extra batting).
  12. Place fleece on the floor add quilt batting and place T-Shirt front on top.
  13. Use large safety pins to connect all 3 fabrics together (I used one safety-pin per square).
  14. If you are making a border with the fleece like I did, fold over the fleece and pin together.
  15. Pin corners.
  16. Sew along the border of the quilt.
  17. Sew the corners (I sewed them by hand with a blind stitch).

    Hand sewn corners
    Hand sewn corners
  18. Connect all 3 layers together throughout the quilt by placing a couple of stitches wherever the panels meet. This will ensure that the fabrics don’t move around. Remove the safety-pins.

    Place a couple of stitches to connect all 3 layers of fabric
    Place a couple of stitches to connect all 3 layers of fabric
  19. Snuggle up on the sofa with your warm quilt and have a hot tea or a hot chocolate.

If you have any questions just let me know. Enjoy!

Love

Anja

Posted on 1 Comment

Reflecting

I just got home from dinner with a very good friend of mine, a fellow artist and an amazing woman.  It’s incredible to see somebody live out their dreams and make it work and it makes me think that I need to try harder. I feel inspired by the conversations we had tonight and I am sitting here in bed reflecting on my life and my art.

I know what my dreams are and I need to go after them. Nobody is going to do it for me and make it happen. So I am making a promise to myself tonight to start by making time for my art, no matter what. Another week cannot pass that I am not picking up a brush or a pencil or my camera. I am reminded that I need a creative outlet and that I have ignored this fact over the past few months. I need to spend more time in my studio again and I need to cherish the amazing friendships I have in my life.

Sweet dreams!

Anja

Posted on Leave a comment

It’s been a while….

It’s been a while. Who am I kidding…it’s been a long time. My life has been a bit crazy. I decided to leave my job at Fusion after 13 years, started a new job, spent a month travelling around in Europe, went on my first business trip ever – to Hawai’i (I know crazy) and have been working a lot of 15 hour days. So considering all that I have not had any time to paint or design any jewelry. It’s been a wild ride and through it all I found a new love – Hawai’i. What an amazing place! I have fallen in love with its beauty and the kindness of the people. I would move there in a second and I know K. says that I say that about every place I travel to, which isn’t totally true. I got to spend a week in Honolulu, got to fly to Maui for the day, drove to the North Shore, went surfing twice, oh and worked over 70 hours that week. I didn’t take a lot of pictures, but here are a few. Mahalo Hawai’i!!!!!

maui
famous north shore shrimp truck
outriggers
surfing
surfers
paradise
Posted on 2 Comments

A month later…

I can’t believe it’s been over a month since my exhibit closed. I have been taking some time off to take care of the business side of things. I had to do my accounting for the year and file my taxes, finish all the orders from my exhibition and just take a little bit of time off. It was nice to have a bit of a break and I feel ready to get back into it again. Last week I started taking a screen printing class at Martha Street Studio. I have always wanted to learn how to screen print but never got a chance to take it in Fine Arts, so now I am finally doing it. The first class was really interesting and I am excited to start playing. 8 weeks of classes – yeah! Stay tuned for some pictures of what I will be creating over the next couple of months.

I wanted to share some of the beautiful pictures that the fabulous photographer Dave Swiecicki took during the opening night of my solo exhibition. I also did a walk through video for all my friends and family in Switzerland that didn’t get the opportunity to be there in person.

Enjoy the pictures and the walk through!

Ciao


Posted on Leave a comment

Home

I love Switzerland so much I am even watching the Bachelor right now… they are in Switzerland and not just anywhere, they are in Zermatt, so extremely close to my hometown Visp. The images of the Matterhorn and Zermatt are making me so homesick and I thought when better to post my Pecha Kucha presentation from a few weeks ago. 

Posted on Leave a comment

Thanks and Happy New Year

I wanted to thank you for your support in 2011 and wish you only the best in 2012! I really enjoyed sharing my art work and things that inspire me through my blog. I had 3,900 blog visits from all over the world (Canada, US, Mexico, Venezuela, Ecuador, Columbia, Brazil, Switzerland, Italy, England, France, Germany, South Africa, Nigeria, Indonesia, India, Saudi Arabia, Hong Kong, Australia and New Zealand).

2012 is going to be an exciting year. My first solo art exhibition is only just over  2 months away. I am really looking forward to seeing the show come together and being able to share it with all of you. I am especially excited that my parents are flying in from Switzerland for opening night.

Thanks for your support and I am looking forward to continually share my passion for art and design with you.

Happy New Year und es guets neues Jahr!

Ciao

Posted on 1 Comment

Great painting technique

We are currently renovating the upstairs of our house and I have been thinking of doing something special on the wall behind our bed. I love the look of wallpaper but didn’t really want to go through the hassle, plus if you get tired of the look then it would be so much harder to change. I was asking myself why I couldn’t recreate the look of wallpaper with paint. I’m an artist after all! I started looking around on the internet for stencils and found lots of really nice ones. Most of them a bit too girly for K. but I ended up finding one that we both love. A great pattern of circles overlapping. Modern, clean and geometric!  I got the stencil in the mail  last week and this weekend I finally got to try it out. We painted the room in 2 different greys (Benjamin Moore Whitestone and Gull Wing). The original idea for the stencil was to use a varnish only so that the effect would be very subtle. I did a test strip in the studio and realized that it worked well on lighter colors but that the Gull Wing grey was too dark for it to work, so I adjusted the plan and used the Whitestone for the stenciling. It took 5 hours to complete but it is so worth it. The end result is amazing. Here are a couple quick photos. I will make sure to blog again once the bamboo hardwood floor is down and the room is put back together.

Here is what you need for this project:

•Paint – 0 VOC (better for you and the environment – you don’t use very much paint so maybe you can use up some paint from a previous project. Think green!)

•Dense  paint roller

• Masking tape

•Stencil (I got mine at cuttingedgestencils.com)

•Spray adhesive (optional – I didn’t use it and it worked out fine)

•Lots of patience!

Just think of the possibilities. Be creative and green at the same time.

Ciao

Anja

First row of stenciling
worth the hard work